# Post-test analysis
Story: “After a test I want to pull data, sometimes from several units, analyze the data in my language of choice, and upload the results back next to the original data.”
This page is for engineers who work with test data after the run, such as an analyst comparing results across tests, a design engineer fitting a model to measured behavior, or a data scientist crunching data from an entire test campaign.
## Post-test analysis prerequisites
Everything on this page starts from [runs](https://dev.nominal.io/platform/reference/glossary.md#run "A named, time-bounded period of interest on one or more assets, such as a test, a flight, or a race session.") and [assets](https://dev.nominal.io/platform/reference/glossary.md#asset "A physical or simulated device or system you track in Nominal, such as a vehicle, a component, a unit under test, or a test stand."). A run represents a test step, execution, or campaign, and an asset represents a [unit under test](https://dev.nominal.io/platform/reference/glossary.md#unit-under-test-uut "The device or system being tested, also called a device under test (DUT).") or a test system. If your units don’t have assets yet, start from [Organize and view your data](https://dev.nominal.io/platform/data-model/paradigms.md). If tests that are already recorded don’t have runs, [mark them after the fact](https://dev.nominal.io/platform/data-model/paradigms/stories/post-test.md#organize-after-the-fact).
A core tool in Nominal is the [workbook](https://dev.nominal.io/platform/reference/glossary.md#workbook "Where you analyze time-series data from assets and runs, in tabs and panels, after a test or live."), which can examine one run or asset on its own or compare it with others.
For example, with the default approach, a workbook reaches its data like this:
```mermaid
---
config:
layout: elk
---
flowchart BT
classDef green fill:#dcfce7,stroke:#15803d,color:#1f2937
classDef red fill:#fee2e2,stroke:#b91c1c,color:#1f2937
classDef purple fill:#e0e7ff,stroke:#4338ca,color:#1f2937
classDef blue fill:#e0f2fe,stroke:#0369a1,color:#1f2937
asset1["Asset: UUT1"]:::green
dataset1[("Dataset
UUT1
Recorded channels")]:::purple
dataset1 -->|"ref name=default"| asset1
run1["Run: Test A"]:::red
asset1 --> run1
workbook1["Workbook
default.temperature"]:::blue
run1 --> workbook1
click asset1 href "../../../#asset" "Asset"
click dataset1 href "../../../#time-series-data" "Time-series data"
click run1 href "../../../#runs" "Runs"
click workbook1 href "../../../../workbooks/" "Workbooks"
```
Once data has been analyzed, the [results can also be stored](https://dev.nominal.io/platform/data-model/paradigms/stories/post-test.md#write-results-back) in Nominal side-by-side with the raw data and workbooks can be used to refer to both the raw and processed data.
```mermaid
---
config:
layout: elk
---
flowchart BT
classDef green fill:#dcfce7,stroke:#15803d,color:#1f2937
classDef red fill:#fee2e2,stroke:#b91c1c,color:#1f2937
classDef purple fill:#e0e7ff,stroke:#4338ca,color:#1f2937
classDef blue fill:#e0f2fe,stroke:#0369a1,color:#1f2937
asset1["Asset: UUT1"]:::green
dataset1[("Dataset
UUT1
Recorded channels")]:::purple
dataset1 -->|"ref name=default"| asset1
derived[("Dataset
UUT1 derived
Calculated channels")]:::purple
derived -->|"ref name=derived"| asset1
run1["Run: Test A"]:::red
asset1 --> run1
workbook1["Workbook
default.temperature
derived.temperature_avg"]:::blue
run1 --> workbook1
click asset1 href "../../../#asset" "Asset"
click dataset1,derived href "../../../#time-series-data" "Time-series data"
click run1 href "../../../#runs" "Runs"
click workbook1 href "../../../../workbooks/" "Workbooks"
```
## Compare and export in the app
### Compare tests without code
A [comparison workbook](https://dev.nominal.io/platform/reference/glossary.md#comparison-workbook "A workbook that compares aggregated metrics, such as each run's mean or maximum, across many runs or assets.") computes statistics, such as each run’s maximum, across many runs or assets, and shows them in a table, scatter plot, or time series.
1. In the sidebar, click **Workbooks**, then the arrow beside **NEW WORKBOOK**, and choose **New comparison workbook**.
2. Click **NEW PANEL** and choose **Comparison table**, **Comparison scatter plot**, or **Comparison time series**.
3. In the new panel, click **CREATE AGGREGATE QUERY**.
4. Under **Apply to**, select the runs to compare. To compare assets instead, click **RUNS**, choose **Select assets**, then select the assets and a time frame.
5. Under **Filter by ranges**, choose the part of each run to compare, for example where a [channel](https://dev.nominal.io/platform/reference/glossary.md#channel "A named signal: a series of measurements or computed values, such as voltage, pressure, or system state.") is above a threshold.
6. Add the channels to compare. In a **Comparison table**, add each one under **Channels for statistical comparison** and choose its statistic.
7. In the **Unsaved changes** bar, click **Apply changes**.
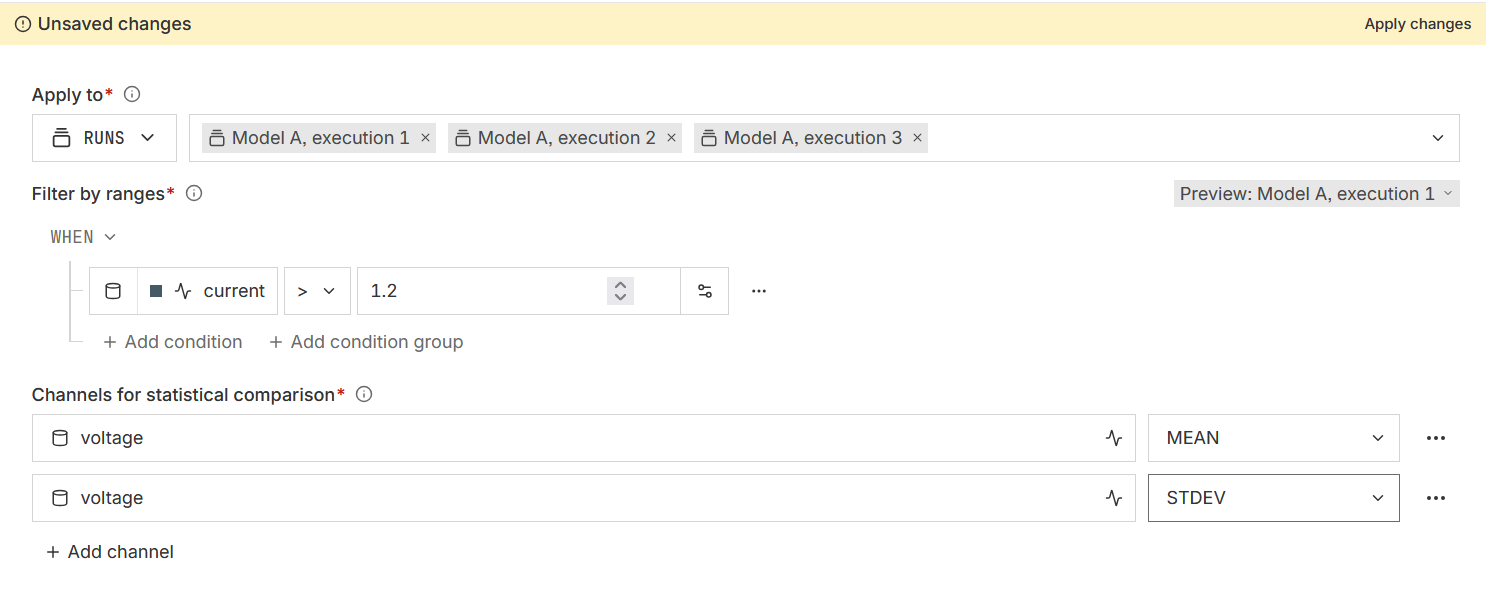
A comparison table then shows one row for each run, with the part of the run the filter matched and each statistic, and a last row that summarizes the runs, such as their **MEAN**.

A **Comparison time series** panel lines each run up at the start of its **Filter by ranges** [range](https://dev.nominal.io/platform/reference/glossary.md#range "A start and end time that marks a period of interest, from time-series output, manual notes, or checklist results.") on its own.
For the statistics a comparison can compute, aggregation windows, and a walkthrough video, see [🔒︎Comparison workbooks](https://docs.nominal.io/core/documentation/platform/workbooks/comparison-workbooks).
### Export to a file
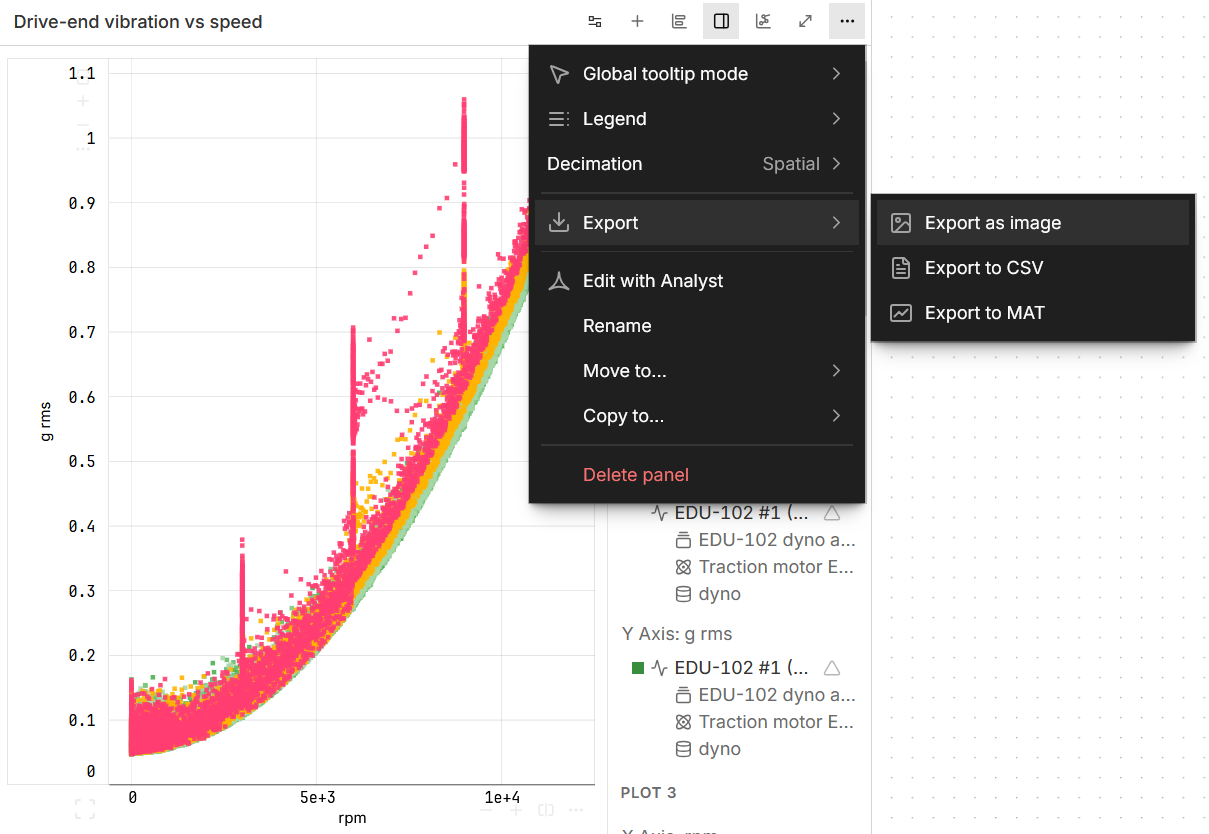
1. In a workbook, open a chart’s **⋯** menu, then **Export**, and choose **Export to CSV** or **Export to MAT**.
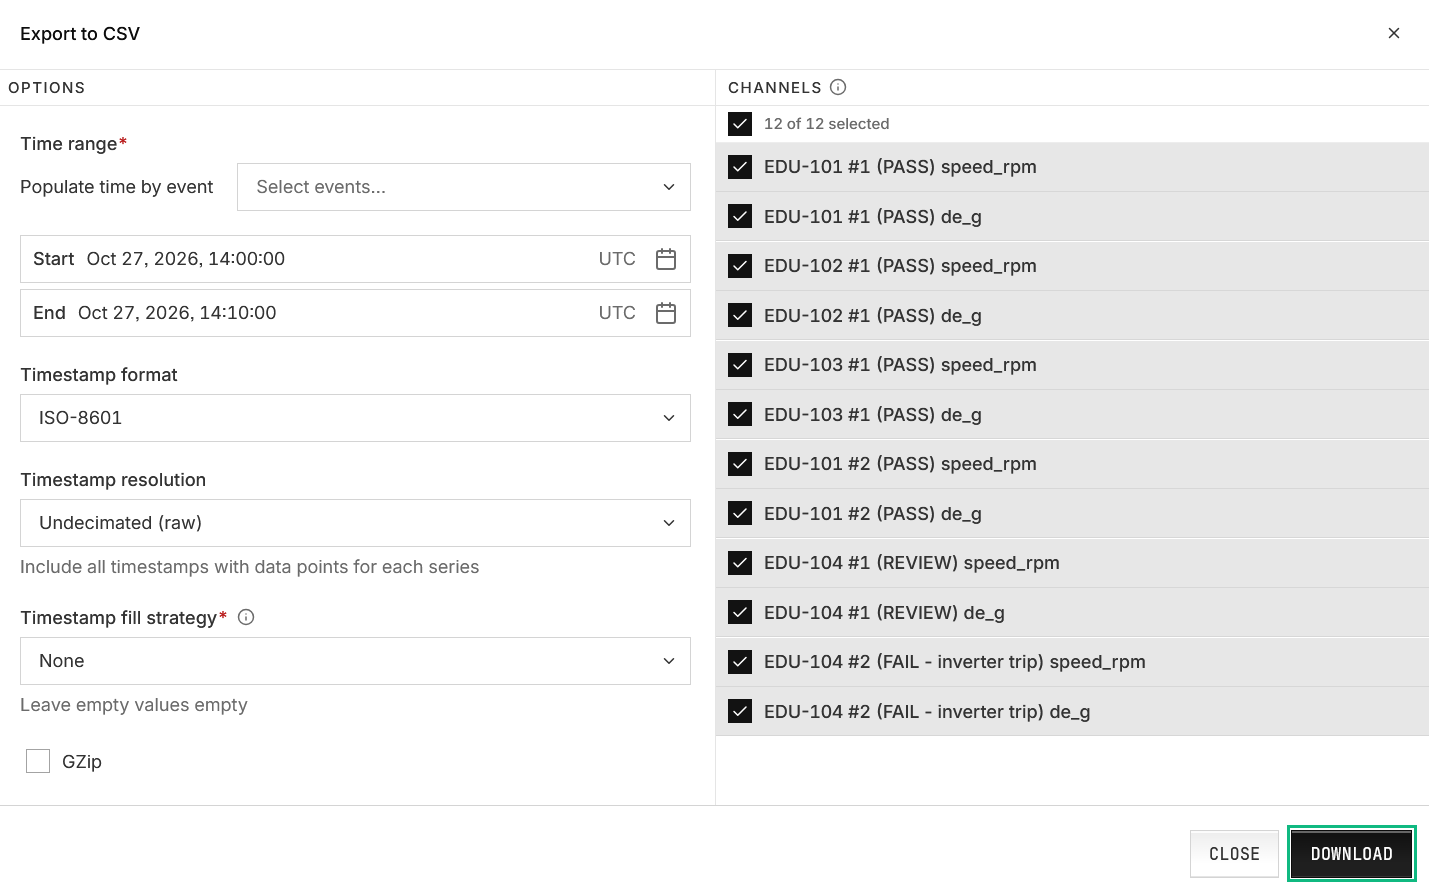
2. Set the **Time range**, the **Timestamp format**, and the **Timestamp resolution** (raw, or resampled to a frequency or period).
3. Pick the channels, then click **DOWNLOAD**.
To export from one of an asset’s data sources instead, open the asset’s **Data sources** tab, click the **Export data** icon on that row, and choose **Export as CSV** or **Export as MAT**.
### Line up tests on one timeline
Tests recorded at different times sit apart on a workbook’s timeline. To display them side by side in a standard workbook, rather than a comparison workbook, shift them in time. A [time offset](https://dev.nominal.io/platform/reference/glossary.md#offset "A time shift applied to data without changing its stored timestamps.") shifts a run’s data in that workbook only, *without changing what’s stored*.
There are two ways to line up runs in a workbook:
- [Align every run at once](https://dev.nominal.io/platform/data-model/paradigms/stories/post-test.md#align-every-run-at-once): line up all the workbook’s runs by their start or end. Start here for managing runs in bulk.
- [Align one run to another](https://dev.nominal.io/platform/data-model/paradigms/stories/post-test.md#align-one-run-to-another): aligns a pair of runs by their start or end, or [by a fixed time offset](https://dev.nominal.io/platform/data-model/paradigms/stories/post-test.md#shift-by-a-fixed-amount).
#### Prerequisite: Adding runs to the panel
To line up tests in a workbook, they must all be available in the workbook’s **DATA** panel. To add runs:
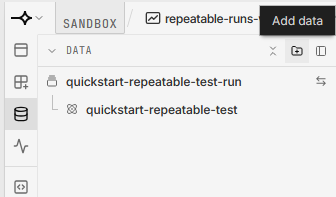
1. In the workbook’s left sidebar, click the **Data** icon to open the **DATA** panel.
2. Click **Add data** at the top of the panel. If a menu opens, choose **New group**, so each run stays separate. Select the runs in **Select runs**, and click **ADD RUN TO THIS WORKBOOK**. With several runs selected, the button counts them, such as **ADD 3 RUNS TO THIS WORKBOOK**.
#### Align every run at once
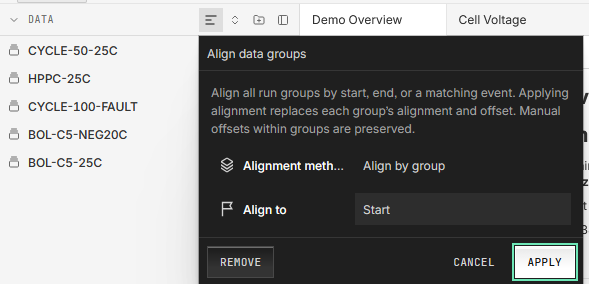
Once the workbook has two or more runs, click **Align data groups** in the **DATA** panel’s header, choose **Align by group**, set **Align to** to **Start** or **End**, and click **APPLY**.
#### Align one run to another
1. In the **DATA** panel, hover over the run to move and click its **Add time offset** icon.
2. Under **Shift method**, choose **Align to run**. Pick the **Alignment run**, and under **Align to** choose **Start** or **End**.
3. Click **ADD TIME OFFSET**.
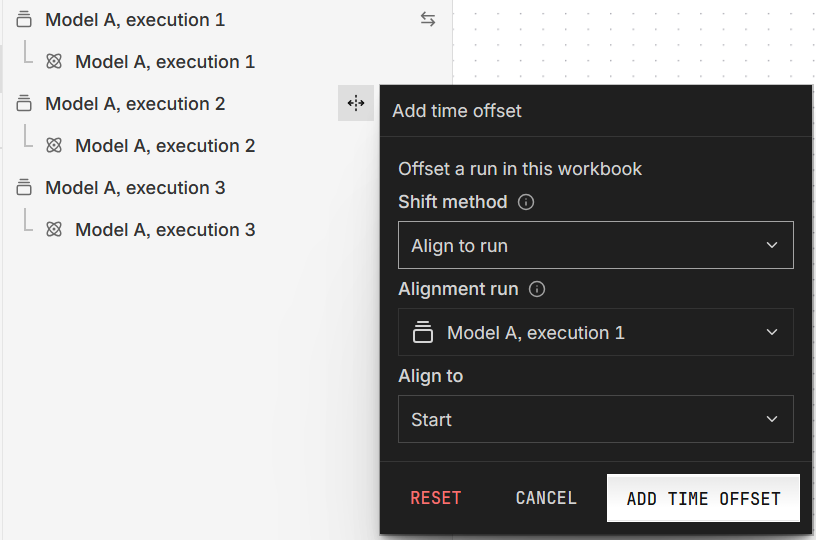
Align runs to a run that has no offset of its own, because **Align to run** uses the reference run’s recorded start or end, not its shifted position.
#### Shift by a fixed amount
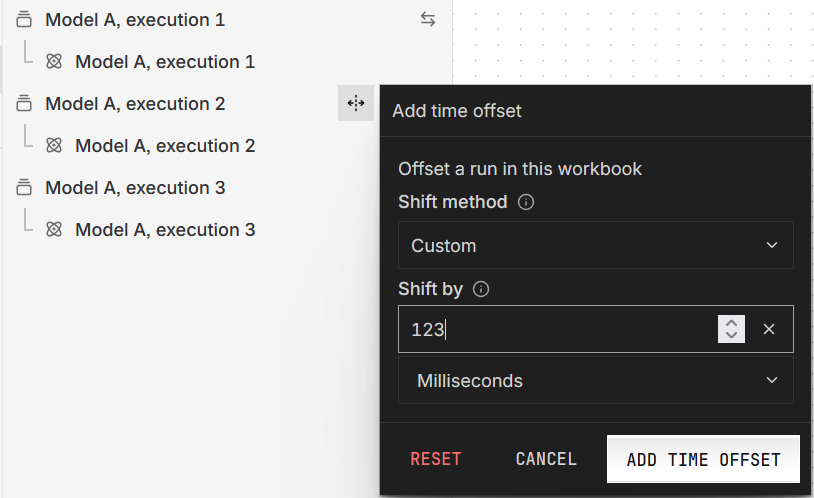
To shift by a fixed amount instead, such as a known clock difference between two loggers, follow [Align one run to another](https://dev.nominal.io/platform/data-model/paradigms/stories/post-test.md#align-one-run-to-another), but choose **Custom** under **Shift method** and enter **Shift by** and its unit.
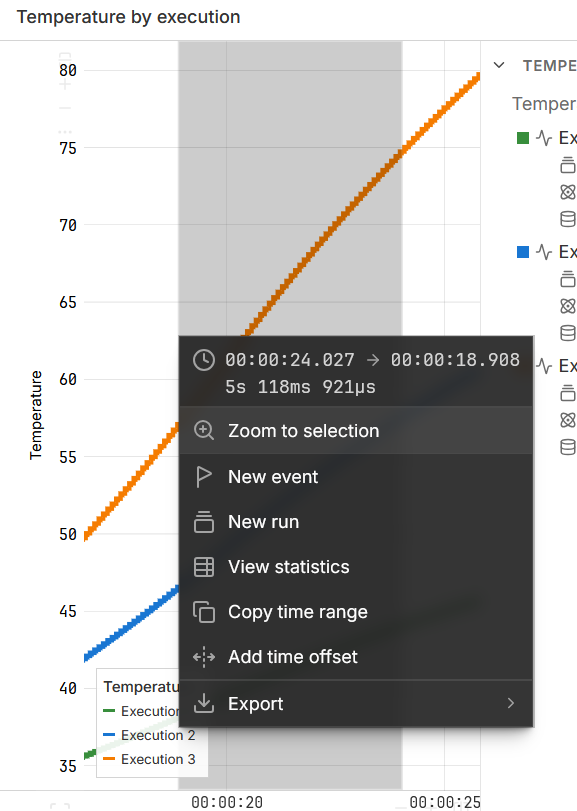
To measure a fixed shift on a chart instead, drag across a [time series](https://dev.nominal.io/platform/reference/glossary.md#series-or-time-series "A sequence of values over time that shows how a signal changes. It can be numeric, categorical, log-based, or range-based.") from a feature to where it should land, choose **Add time offset**, pick the run, asset, or [data scope](https://dev.nominal.io/platform/reference/glossary.md#data-scope "The link between an asset or run and a data source, named by its ref name. It can filter the data source by tags and shift its timestamps.") under **Add offset to**, and click **APPLY**. Offsets on a data scope, asset, and run add up, so adjust complex offsets in that order.
## Work in code
### Pull data into your code
If the asset filters a shared [dataset](https://dev.nominal.io/platform/reference/glossary.md#dataset "A store in Nominal for time-series and log data, which grows as you upload or stream more into it.") by [tag](https://dev.nominal.io/platform/reference/glossary.md#tag "A key-value pair on your data points, such as motor_id: 1, that lets you filter a subset of points from a single dataset."), as in the [tagged approach](https://dev.nominal.io/platform/data-model/organization/tagged-data.md), pass the same tags when you pull its data, with `tags={...}` in Python or `Tags=struct(...)` in MATLAB.
**Python**
Get the run’s dataset by its [ref name](https://dev.nominal.io/platform/reference/glossary.md#ref-name "The name an asset or run gives each data source attached to it, such as default. Workbooks and checklists find channels by ref name and channel name."). `datasource_to_dataframe` returns a pandas DataFrame with one column per [channel](https://dev.nominal.io/platform/reference/glossary.md#channel "A named signal: a series of measurements or computed values, such as voltage, pressure, or system state.") and a UTC timestamp index:
```python
from nominal.core import NominalClient
from nominal.thirdparty.pandas import datasource_to_dataframe
client = NominalClient.from_profile("default")
run = client.get_run("")
dataset = run.get_dataset("default") # the run's data, by ref name
df = datasource_to_dataframe(
dataset,
start=run.start,
end=run.end,
)
```
For several tests, search for their runs and pull each one:
```python
runs = client.search_runs(labels=["acceptance"])
frames = {
r.name: datasource_to_dataframe(r.get_dataset("default"), channel_exact_match=["temperature"], start=r.start, end=r.end)
for r in runs
}
```
**MATLAB**
`fetch` returns a timetable for one [channel](https://dev.nominal.io/platform/reference/glossary.md#channel "A named signal: a series of measurements or computed values, such as voltage, pressure, or system state."). A run’s [data sources](https://dev.nominal.io/platform/reference/glossary.md#data-source "Anything an asset or run reads time-series data from: a dataset, a connection to an external database, or a video.") are its asset’s:
```matlab
client = nominal.Client.fromProfile();
r = client.runByRid("");
asset = client.assetByRid(r.AssetRids(1));
sources = asset.datasources();
dataset = client.datasetByRid(sources.Rid(sources.RefName == "default"));
temperature = dataset.fetch("temperature", r.StartTime, r.EndTime);
current = dataset.fetch("current", r.StartTime, r.EndTime);
tt = synchronize(temperature, current); % one timetable with both channels
```
> **Note**
>
> This code relies on runs being completed because it uses the run’s end time.
### Write results back
Before calculating in code, check whether a workbook can do it. [Transforms](https://dev.nominal.io/platform/reference/glossary.md#transform "An operation that builds a new time series from an existing one, such as a rate of change or a unit conversion, without changing the original data.") cover calculations such as unit conversions and rates of change, and formulas combine channels, as in [How does analysis work in Nominal?](https://dev.nominal.io/platform/data-model/paradigms/stories/on-console.md#how-does-analysis-work-in-nominal). Their results stay in the workbook, with nothing to upload.
Put calculated channels in a dataset of their own and attach it to the asset under its own [ref name](https://dev.nominal.io/platform/reference/glossary.md#ref-name "The name an asset or run gives each data source attached to it, such as default. Workbooks and checklists find channels by ref name and channel name."), like `derived`. A workbook can then refer to both the original and processed data. If the run’s asset was generated automatically, as it is for a run created directly from a dataset, attach the results to the run instead.
**Python**
```python
from nominal.thirdparty.pandas import upload_dataframe_to_dataset
out = df[["temperature"]].rolling(50).mean().add_suffix("_avg").dropna()
out.index = out.index.as_unit("ns").asi8 # nanoseconds since the epoch
out.index.name = "timestamp"
asset = run.list_assets()[0]
try:
derived = asset.get_dataset("derived") # one results dataset per asset
except ValueError:
derived = client.create_dataset(f"{asset.name} derived")
asset.add_dataset("derived", derived)
upload_dataframe_to_dataset(derived, out, timestamp_column="timestamp", timestamp_type="epoch_nanoseconds")
```
`upload_dataframe_to_dataset` waits until the upload has been [ingested](https://dev.nominal.io/platform/reference/glossary.md#ingest "Processing an uploaded file into a dataset: reading its rows, placing each point in time, and storing the values in channels.").
**MATLAB**
```matlab
avg = movmean(temperature.temperature, [49 0]); % trailing 50-sample mean
derived = asset.getOrCreateDataset(asset.Name + " derived", "derived"); % one results dataset per asset
derived.write("temperature_avg", temperature.Time, avg);
```
`write` returns once the data is accepted, before it’s [ingested](https://dev.nominal.io/platform/reference/glossary.md#ingest "Processing an uploaded file into a dataset: reading its rows, placing each point in time, and storing the values in channels."), and suits up to about 50,000 points per call. For more, [stream](https://dev.nominal.io/platform/reference/glossary.md#stream "To send points to Nominal as they're produced, instead of uploading a finished file.") them with `derived.stream()`.
### Query with SQL
To filter or aggregate before the data leaves Nominal, query it with [SQL](https://dev.nominal.io/sql-guides.md). In the app, open **SQL** under **Data** in the sidebar. From code, call the SQL REST API, as in [Executing SQL](https://dev.nominal.io/quickstart/quick/quick-sql.md).
## Organize data after the fact
Data that’s already recorded can still be organized by marking each test’s time range on its asset as a run. Comparing, exporting, lining up, and pulling data, as above, then work on it like any other run.
### Mark a past test as a run
1. Open the asset and find the test on the timeline above its tabs, using the period menu (such as **WEEK**), **Fit to today** (the calendar icon), or the arrows.
2. Drag across the timeline over the test and choose **New run from time bounds**. The run’s asset, **Start**, and **End** are filled in.

3. Enter a title, and optionally add **Labels** and [properties](https://dev.nominal.io/platform/reference/glossary.md#property "A key-value pair, of type Text or Number, that describes an asset, run, or data source, such as an identifier, context, or a quantity.").
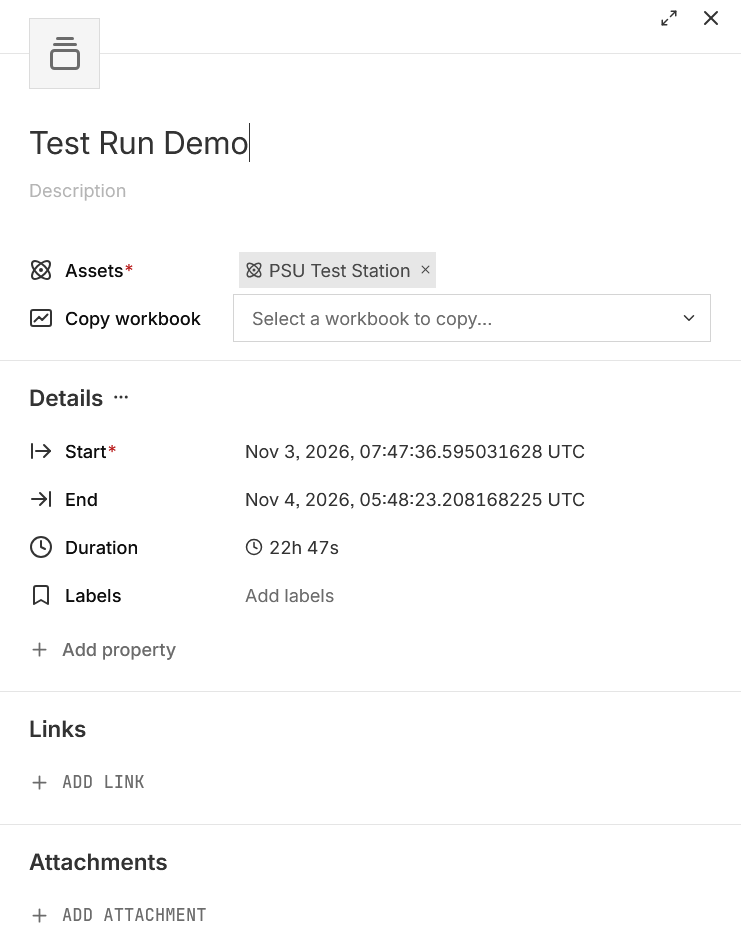
4. Click **CREATE RUN**.
You can also drag across a time series chart in a workbook and choose **New run**, or use **New run from file time range** in a file’s **⋯** menu on the asset’s **Data sources** tab. **NEW RUN** on the **Runs** page starts with nothing filled in.
**Python**
```python
from datetime import datetime, timezone
from nominal.core import NominalClient
client = NominalClient.from_profile("default")
asset = client.get_asset("")
run = asset.create_run(
"Acceptance test 12",
start=datetime(2026, 1, 1, 14, 0, tzinfo=timezone.utc),
end=datetime(2026, 1, 1, 14, 30, tzinfo=timezone.utc),
labels=["acceptance"],
)
```
**MATLAB**
```matlab
client = nominal.Client.fromProfile();
asset = client.assetByRid("");
t0 = datetime("2026-01-01 14:00:00", TimeZone="UTC");
t1 = datetime("2026-01-01 14:30:00", TimeZone="UTC");
r = asset.run("Acceptance test 12", t0).finish(t1);
r = r.update(Labels=["acceptance"]);
```
### Group runs with labels and properties
1. Open the run or asset. In its properties panel, click **Labels** (**Add labels** when there are none) and pick or create a label.
2. To add a property, click **Add property**, pick or create a key, then set its value.
Changes save as you make them. To label several runs or assets at once, select them on the **Runs** or **Assets** page and click **EDIT LABELS**.
**Python**
```python
from nominal.core import NominalClient
client = NominalClient.from_profile("default")
run = client.get_run("") # or client.get_asset(...); assets work the same way
# update replaces labels and properties, so keep the existing ones
run.update(labels=[*run.labels, "acceptance"], properties={**run.properties, "campaign": "Q4"})
```
**MATLAB**
```matlab
client = nominal.Client.fromProfile();
r = client.runByRid(""); % or client.assetByRid(...)
r = r.update(Labels=[r.Labels "acceptance"]); % Labels replaces the run's labels
```
Setting `Properties` replaces all of the run’s properties, so this example only adds a label.
**Rust**
```rust
use nominal::core::RunUpdate;
let client = nominal::NominalClient::from_profile("default")?;
let rid = "";
let run = client.runs().get(rid).await?;
// update replaces labels and properties, so keep the existing ones
let mut labels = run.labels().to_vec();
labels.push("acceptance".into());
let mut properties = run.properties().clone();
properties.insert("campaign".into(), "Q4".into());
client.runs().update(rid, RunUpdate::new().labels(labels).properties(properties)).await?;
// assets work the same way, with client.assets() and AssetUpdate
```
**Go**
This Go example updates an asset:
```go
import (
nominalapi "github.com/nominal-io/nominal-api-go/io/nominal/api"
assetapi "github.com/nominal-io/nominal-api-go/scout/asset/api"
"github.com/nominal-io/nominal-api-go/scout/assets"
scoutrids "github.com/nominal-io/nominal-api-go/scout/rids/api"
"github.com/palantir/pkg/rid"
)
// httpClient is a conjure-go-runtime httpclient.Client for your Nominal REST API URL,
// and token is your API key as a bearertoken.Token
assetClient := assets.NewAssetServiceClient(httpClient)
parsed, _ := rid.ParseRID("")
assetRid := scoutrids.AssetRid(parsed)
found, _ := assetClient.GetAssets(ctx, token, []scoutrids.AssetRid{assetRid})
asset := found[assetRid]
// the update replaces labels and properties, so keep the existing ones
labels := append(asset.Labels, "acceptance")
properties := map[nominalapi.PropertyName]nominalapi.PropertyValue{"campaign": "Q4"}
for k, v := range asset.Properties {
if _, set := properties[k]; !set {
properties[k] = v
}
}
assetClient.UpdateAsset(ctx, token, assetRid, assetapi.UpdateAssetRequest{Labels: &labels, Properties: &properties})
```
To find the runs together later:
1. In the sidebar, click **Runs**, then **FILTERS**.
2. Choose **Label** and pick the labels, or choose a property’s key and pick its value. With more than one filter, click **MATCH ALL FILTERS** to switch it to **MATCH ANY FILTER**.
3. To keep the search, click **NEW VIEW**. Right-click the view’s tab to rename it.
**Python**
```python
from nominal.core import NominalClient
client = NominalClient.from_profile("default")
# a run must have every label and property listed
runs = client.search_runs(labels=["acceptance"], properties={"campaign": "Q4"})
for run in runs:
print(run.name, run.rid)
```
**Rust**
```rust
use nominal::core::RunQuery;
let client = nominal::NominalClient::from_profile("default")?;
// a run must match every query listed
let runs = client.runs()
.search(RunQuery::and([RunQuery::label("acceptance"), RunQuery::property("campaign", "Q4")]))
.await?;
for run in &runs {
println!("{} {}", run.name(), run.rid());
}
```
### Attach additional data
If some of a test’s data was recorded into a [dataset](https://dev.nominal.io/platform/reference/glossary.md#dataset "A store in Nominal for time-series and log data, which grows as you upload or stream more into it.") that isn’t already attached to the asset, you can add it under its own [ref name](https://dev.nominal.io/platform/reference/glossary.md#ref-name "The name an asset or run gives each data source attached to it, such as default. Workbooks and checklists find channels by ref name and channel name."):
1. Open the asset. If its properties panel is hidden, open it with the panel icon at the top right, beside **NEW WORKBOOK**. Find the **Data source** section.
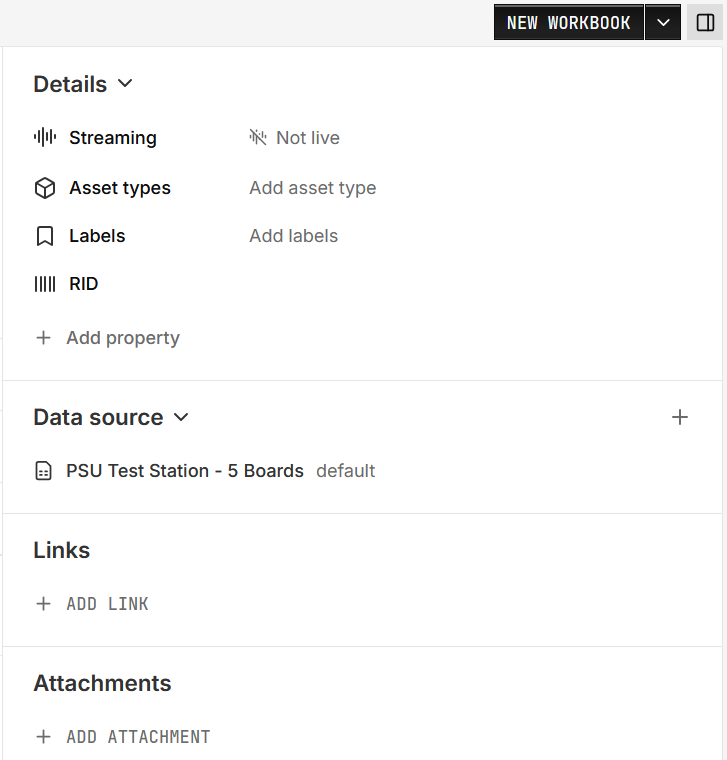
2. Click **+** (**Add data source**) and pick the dataset. If the asset has no data sources yet, click **ADD DATA SOURCE** instead.
3. Under **Refname**, choose or create a [ref name](https://dev.nominal.io/platform/reference/glossary.md#ref-name "The name an asset or run gives each data source attached to it, such as default. Workbooks and checklists find channels by ref name and channel name.").
4. To attach only part of a shared dataset, click **ADD TAG FILTERS**, choose the tag key, then click its value and pick the value.
5. Click **SAVE TO ASSET**.
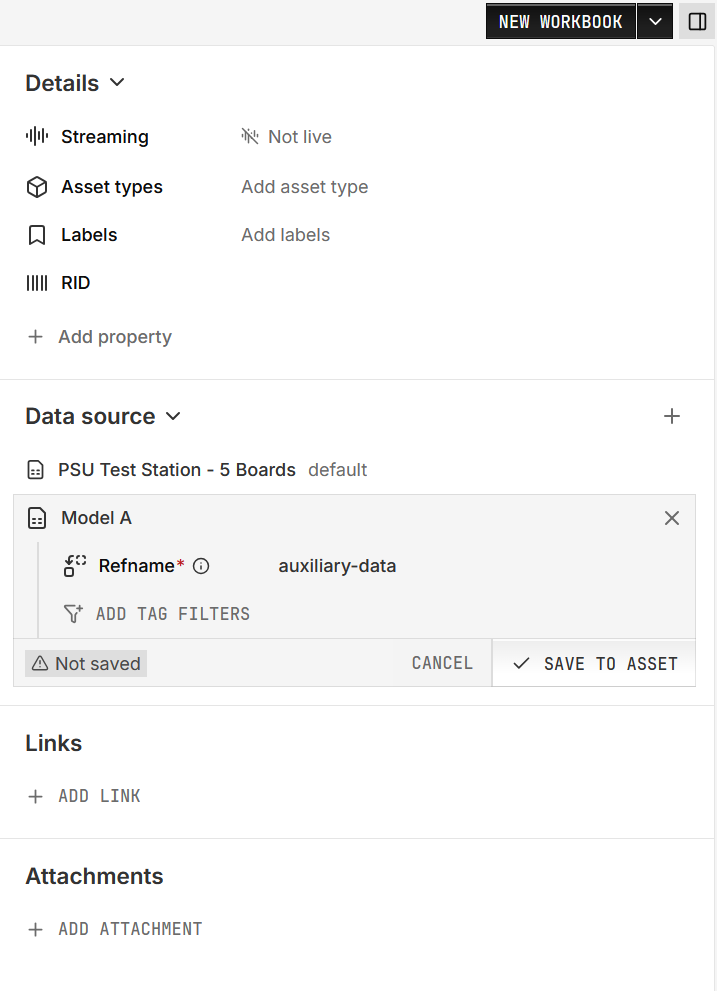
Every run on the asset now includes the dataset under that ref name.
**Python**
```python
dataset = client.get_dataset("")
asset.add_dataset("logger_b", dataset)
```
**MATLAB**
```matlab
dataset = client.datasetByRid("");
asset.addDataset(dataset, "logger_b");
```
## Next steps
- [Exporting data](https://dev.nominal.io/quickstart/quick/quick-export.md) and [Exporting data by SQL](https://dev.nominal.io/quickstart/quick/quick-sql-export.md): the same tasks in other languages.
- [Repeatable test execution](https://dev.nominal.io/platform/data-model/paradigms/stories/repeatable-runs.md): how tests become runs in the first place.
- [The SQL guides](https://dev.nominal.io/sql-guides.md): the tables, scoping rules, and query patterns.